Pages

Monday, April 30, 2012

QUICK & EASY COFFEE TABLE MAKEOVER


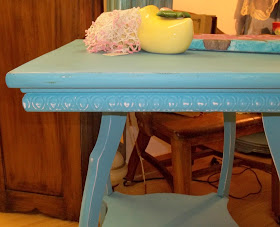
See those pretty legs!!!  That's why I bought this little coffee table.  I have no before pictures, but it really didn't look very special.  But, I knew, with legs like that, she'd definitely turn some heads if she put on a little makeup.........or had a little makeover.  8-)

So, after a quick sanding, I painted her with a basic white satin paint.  Then, trimmed her with my favorite cottage green.  After drying, she still needed a little something extra.  The details just didn't shine yet.  Since I had no gray stain, I took a dab of black acrylic craft paint, thinned it with water, then brushed it over the table..........a small section at a time.  After brushing on, I almost immediately wiped it away with a soft paper towel, leaving it in the recessed areas.  See how it makes the detail POP??? 

THEN, for the final step, I took her up to Lawrenceburg Glass to get a glass top cut.  And, now she has the perfect place to display some of your favorite keepsakes and pictures.  This one showcases pictures of my family and special linens.  Of course, when she sold, I kept all those special items.  I just used them to give my customers ideas as to how to display their own special goodies.


Isn't is amazing what a little paint and lipstick can do to make a girl look brand new???

What cha think?

All Ya'll Come Back to See Me Soon.  8-)


Linkin up to these parties:

http://adventuresofadiymom.blogspot.com/


Wednesday, April 25, 2012

Mommy Is CooCoo

This Mommy may be CooCoo, but I think she's got it 'goin on'.  
She has 3 little ones at home and still finds time to do neat crafty things.  She recently asked me if I'd like to trade posts and I jumped on the idea.  So, without further ado, here she is.  Please go visit her blog, and tell her Candy sent ya.


Hello! I am Amanda and I blog at mommy is coocoo.


~ My blog is all about fun! ~

Whether you are laughing about the realities of marriage and motherhood or being inspired to make your everyday surroundings lovely, regardless of your budget. I am thrilled to be guest posting today!  I'd like to share with you two projects near and dear to my heart.  I hope these projects inspires you!


~  1. Cork Board made from wine corks ~

I've been collecting wine corks for more than fifteen years. I have always appreciated the unique look of the corks and I knew something great could be made from them.  To make this cork board I bought a frame and had cheap matte board cut to fit.  I used hot glue to attach the corks.  I placed my corks along the perimeter of the frame and worked my way in (glue the corks in sections as you go). 


2. Antique Door ~ Turned Free-Standing Door w Mirror
~ a  ($20) fairytale before & after story ~

I bought an antique door with mirror as a gift
  for Emmerson's first birthday.


~ before ~


Although this door was in very bad shape when I found it, it was easy to see it had a lot of potential. Beveled mirrors in doors are very rare.  The mirror was covered with paint. The door frame had been painted and repainted over and over again. The paint was peeling and chipping off. Also, due to the amount of grime on the back of the door, I suspect it may have been in a fire.

Did this deter me?

Not in the least!   this coocoo momma LOVEs old doors!

~ after ~

Here's how I did it:

  1. I sanded and scraped and sanded and sanded. Old doors often have been painted with led paint and I wanted to make sure all of this was gone before the door went to live in Emmy's bedroom.
  2. After cleaning off the door with a wet cloth, I primed it.
  3. Then, I applied my first layer of pink paint using a small roller.
  4. I lightly sanded the door allowing some of the light colored primer paint to show through.
  5. I then cleaned all the dust off the door again and applied the second coat of pink paint (this time I used 1/2 glaze 1/2 pink paint to allow some of the imperfections to show through).
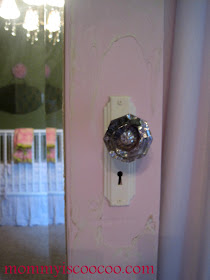
  6. Finally, I added two hooks, the doorplate, and bird stencils.

~ a free-standing door with mirror ~
~ painted two different shades of pale pink ~
~ I added two (spray painted) crown hooks ~
{which I bought at the goodwill}

~ a vintage door plate and glass doorknob ~

~ I added two bird stencils ~
{Emmerson's momma is coocoo for birds right now}

Thank you for allowing me to share today Candice.  This coocoo Momma couldn't be more grateful! If you'd like to see other coocoo projects or learn more about the whole coocoo family, head on over to my blog  mommy is coocoo.

Tuesday, April 24, 2012

Chalk Paint STICKS TO ANYTHING

Okay Folks.  This was the true test for my chalk paint mixture.  I'd had this cute little 2 drawer chest for probably 2 years.......stuck back in a corner of my workshop.  I just dreaded tryin to do anything with it, since it had one of those slick Formica tops.  I didn't know if I'd have to sand the daylights out of it, or what I could do to make the paint stick.  But, that was all BEFORE I'd heard of chalk paint.  So, I used the paint that I told you about HERE, but instead of using it straight from the bucket, I mixed up a batch of homemade chalk paint........recipes are found HERE.  So far, I've only tried the Plaster of Paris recipe.   

As usual, I forgot to get BEFORE pictures.  But, here are several DURING and AFTER shot.  Remember my camera met with a little bad luck, mentioned HERE, so my pictures are still not very sharp.  Oh well.  


Before painting, take off the hardware..........well duh.  Then brush on two coats of the chalk paint mixture, sanding lightly between coats.  And, guess what.  My MIRACLE CHALK PAINT stuck to that Formica top really well....no prob.  8-)


Then, just brush on Minwax Dark Walnut.  And, then....wipe it off, using a soft cloth or paper towel.


You can choose just how much stain you want to leave on.


I spray painted the hardware with an off white, then antiqued it as well.
Put it back on....and here she is.  Look at the next page to she her after arriving at the shop.


Friday, April 20, 2012

MAKE A CHAIR PLANTER

I don't know about you folks, but one of MY favorite places to shop is The Home Depot.  Annnnd, favorite department?  Well, paint, of course.  And, a little secret for ya.  Always ask if they have any OOPS paint.  Okay, my secret is out.  So, stay away from MY local Home Depot.  All their oops paints get checked out by ME first.


My most recent oops purchase was a gallon of Behr (which is GREAT paint) in a sooo pretty shade of green.  Since it is oops, they don't mark it with a name or mixture, so I'm callin it Cottage Green.  And, just guess what it cost???  Only $7.00/gallon.  So that makes it eeeeven prettier.  


Oh, and before I show you my pics, let me give you ANOTHER tip.  Don't leave your camera OUT IN THE RAIN.  Is there a pattern starting to develop here?  Check out this project that was also LEFT OUT IN THE RAIN.  I salvaged that project, but I'm not so sure about my camera.  This is why people like me can't have expensive toys.  I've washed one phone with a load of clothes and dropped yet another in, yes, the toilet!!!  And, now, I leave my camera out to be rained on??  


Sooo, all that to say, my pics are not the best in the world.  But, after the camera sets in the rice bowl for another few days, maybe pics will improve.  8-)  And, that really does work.  At least it did for one of the phones.  I took it apart and then put all the parts down into a bowl of rice......left it for several days, and IT WORKED.


For directions on painting this sweet little chair/flower pot............

Thursday, April 19, 2012

HIGHBOY CHEST OF DRAWERS


Recently at an auction, I purchased this gorgeous antique highboy chest of drawers.   The wood is quarter sawn oak, and the finish WAS in really good shape.  UNTIL....................

Tuesday, April 17, 2012

YELLOW CHALK PAINT PROJECTS

We've had so much beautiful weather lately, I just had to get the paint brushes out.  Sooo, one sunny day made me want to paint everything a SUNNY YELLOW.  And, here are the results.  


I started with this little child's porch rocker.

I'm lovin this home made chalk paint and mixed up a batch of yellow for these projects.  The only mixture I've tried so far is the Plaster of Paris Recipe............which is:
 one part hot water, one part Plaster of Paris to two parts latex paint.


After two coats of the chalk paint mixture, I like to sand the edges to give things that shabby, aged look.  For that, I always use my lil Mouse sander by Black and Decker...........perfect size for us ladies.


Finished and sittin in front of the shop.  It's more yellow that it appears here.

And of course, while painting this piece, and the brushes are already wet, gotta do more that just ONE project.


I wasn't sure how painting the cane seat would do.  But, so far, the chalk paint sticks to everything I've tried it on..........so here goes.


Yelp.  Worked great!!!


What about this little child's desk/side table???


LOVE IT!!!


And, just to clean the paint outta the brushes, I painted a couple baskets too.  8-)


What cha think???  Five projects in one afternoon.  Not a bad afternoon's work.

Oh, you might check out THIS POST where you'll find MORE CHALK PAINT RECIPES. 

Ya'll come back to see me soon.


Linking to these parties:

http://missmustardseed.com/2012/04/furniture-feature-friday-favorites-a-link-party-8/


Tuesday, April 10, 2012

ANOTHER CHALK PAINT PROJECT


Again, I forgot to get BEFORE pictures before jumping into redoing this sweeeet table.  
The top had been painted a terrible kelly green enamel and the rest was done in white enamel.  So, to keep from having to do lots of prep work, I decided to use chalk paint on this one.  And, it worked amazingly yet again!!!  8-)

I used the plaster of Paris recipe which is given HERE.  The paint, I had mixed , using a deep turquoise and adding white to make a prettier, softer color.  I put on two coats, sanding between coats.  And, since I love the soft chalky look, I didn't wax or do any other kind of finish.  If you want, you can add a finish, but it changes the soft look.  

This neat old piece still sported its original label on the bottom saying, Maddox Table Company, Jamestown, N.Y.  After a little research, I believe this to have been produced between the late 1800's and no later than the 1920's.   Just look at the detail.


Sanding a little around the edges allowed the white and green to show through.


Add items that match and she's ready to use.


See ya'll soon with more makeovers.  8-)


Linkin' up with Gina at TRANSFORMATION THURSDAY


Saturday, April 7, 2012

PAINTING WITH PARKINSON'S

What you find below is a different take on my usual "Pickin-N-Paintin" posts.  I want to show you some of the paintings I carry in my shop, that are done by a new artist. Since April is National Parkinson's Awareness Month, this post seemed  fitting. Laramie is my partner in business and in life and he just started painting in December of 2011. He has been battling YOPD, Young Onset Parkinson's Disease, for over 13 years now, and painting is his new therapy.  Recently he read an article about people with Parkinson's Disease using painting as a form of therapy and decided to try it for himself. He is an engineer by trade and had never painted before he decided this was something he could do (he's kind of arrogant in that way). Anyway, since I've been painting for years, we had all of the supplies for him to start.  So, without any instruction whatsoever, one day he just picked up a brush and began to paint.
There are many days that he can't paint due to the disease or the side effects of the medicines, but whenever he can, he does. He also suffers from Central Pain Syndrome which also limits his ability to paint whenever he wants.

At best, it seems to help for a while, and it takes his mind off of his conditions as he gets lost in what he is doing. His hand can be shaking with tremors, but as soon as he picks up the brush, it stops.  It seems that he has found his niche in using only two colors and simple lines to represent his subjects. 


Let me just show you some of his paintings, and remember, he only began in December 2011!!!


And, these two below, were Christmas gifts for a couple special ladies.


 Below is taken from "Painting with Parkinson's" by A. Atkin.


HOW DOES PAINTING WITH PARKINSON’S HELP?
When in the creative mode the brain is working subconsciously with low stress levels. Learning new skills helps to keep you active and helps to combat depression.
There is improved mental health.
There is evidence to suggest that Parkinson’s Disease actually enhances creativity
rather than decrease it.  Art activities help you to become physically and mentally relaxed.
Research shows that physiological functions, such as heart rate, blood pressure and
respiration slow when people are deeply involved in an activity they enjoy.
Also making art provides an opportunity for someone to exercise their hands and
their eyes, improve eyehand coordination and stimulate neurological pathways
from the brains to the hands.
Stress reduction is also of significant benefit as stress can intensify pain and other
symptoms of disease.

 As I said before, his paintings are for sale in my shop, Candy's Memories, and on Yessy.com under the name TennMo Studios. A portion of the proceeds of the sale of his artwork will be donated to the Michael J. Fox Foundation for Parkinson's Disease.

Other related links are listed below:
http://www.pdf.org/fall08_painting_and_parkinsons
http://vimeo.com/14596334
http://www.youtube.com/watch?v=9ejsuwrdI0I
http://blog.michaeljfox.org/2012/03/painting-for-parkinsons-western-artists-reunite-to-raise-funds-and-awareness-for-team-fox/
http://paulrubyfoundation.org/pfp.html